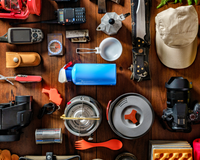
Camping and hiking gear can take a lot of wear and tear, especially during extended trips in the great outdoors. Tents, backpacks, sleeping bags, and other essential gear can easily become damaged or worn out over time. However, with the right tools and techniques, you can repair your gear and extend its lifespan for future adventures.
In this guide, we'll explore how to repair some of the most common types of camping and hiking gear.
Tents:
Tents are one of the most critical pieces of camping gear, providing shelter from the elements. However, they are also prone to damage from sticks, rocks, and other hazards. To repair a tent, follow these steps:
-
Locate the damaged area: Look for any tears, rips, or holes in the tent fabric or mesh screens.
-
Clean the area: Use a damp cloth to clean the area around the damage. This will help remove any dirt or debris that may interfere with the repair process.
-
Assess the damage: Determine the size and severity of the damage. If it's a small tear or hole, you may be able to repair it with a simple patch. If the damage is more significant, you may need to replace the affected area.
-
Use a tent repair kit: If you have a tent repair kit, follow the instructions provided. Typically, these kits include adhesive patches, fabric patches, and seam sealer. Apply the adhesive or fabric patch to the damaged area and use the seam sealer to create a waterproof seal around the patch.
-
Replace damaged parts: If the damage is extensive, you may need to replace the damaged part entirely. Many outdoor equipment stores sell replacement parts for tents, including poles, zippers, and tent fabric.
Backpacks:
Backpacks are another essential piece of camping gear, carrying everything from food and water to sleeping bags and tents. However, they can become worn or damaged over time. To repair a backpack, follow these steps:
-
Identify the damage: Look for any tears or holes in the backpack fabric or straps.
-
Clean the area: Use a damp cloth to clean the area around the damage. This will help remove any dirt or debris that may interfere with the repair process.
-
Patch the damage: Use a patch kit designed for backpacks to repair any holes or tears. These kits typically include adhesive patches and fabric patches.
-
Replace damaged parts: If a buckle or strap is damaged, you may need to replace it entirely. Many outdoor equipment stores sell replacement parts for backpacks.
Sleeping Bags:
Sleeping bags are crucial for a comfortable night's sleep while camping. However, they can become damaged or worn out over time. To repair a sleeping bag, follow these steps:
-
Locate the damage: Look for any tears or holes in the sleeping bag fabric.
-
Clean the area: Use a damp cloth to clean the area around the damage. This will help remove any dirt or debris that may interfere with the repair process.
-
Patch the damage: Use a patch kit designed for sleeping bags to repair any holes or tears. These kits typically include adhesive patches and fabric patches.
-
Replace damaged parts: If a zipper or drawstring is damaged, you may need to replace it entirely. Many outdoor equipment stores sell replacement parts for sleeping bags.
Shoes and Boots:
Shoes and boots are essential for hiking, but they can become worn out over time. To repair shoes and boots, follow these steps:
- Identify the damage: Look for any tears or holes in the shoe or boot fabric.
- Clean the area: Use a damp cloth to clean the area around the damage. This will help remove any dirt or debris that may interfere with the repair process.
- Patch the damage: Use a patch kit designed for shoes and boots to repair any holes or tears. These kits typically include adhesive patches and fabric patches.
- Replace damaged parts: If the sole or heel is damaged, you may need to replace it entirely. Many outdoor equipment stores sell replacement parts for shoes and boots.
In conclusion, repairing your camping and hiking gear is a crucial skill for any outdoor enthusiast. By following these simple steps and using the right tools and materials, you can extend the life of your gear and save money in the long run. Remember to always clean the damaged area before attempting any repairs and, when in doubt, seek advice from a professional outdoor equipment store. Happy camping and hiking!
When going on a long camping or hiking trip, it's essential to be prepared for gear repairs. Here are some additional considerations and a list of repair items to take with you:
Considerations:
-
Bring spare parts: Consider bringing spare parts for your gear, such as tent poles, buckles, or straps. These items can be challenging to find in the wilderness and can make the difference between a functional or unusable piece of gear.
-
Check your gear before leaving: Inspect your gear thoroughly before leaving for your trip. Look for any signs of wear or damage, and make any necessary repairs beforehand.
-
Learn basic repair skills: Familiarize yourself with basic repair skills and techniques, such as patching and sewing. This knowledge can come in handy in case of unexpected damage.
-
Pack extra repair materials: Bring extra repair materials, such as adhesive patches, fabric patches, seam sealer, and duct tape. These items are lightweight and can save you from a gear disaster.
List of Repair Items:
- Adhesive patches
- Fabric patches
- Seam sealer
- Duct tape
- Extra tent stakes
- Replacement tent poles
- Replacement buckles
- Needle and thread
- Scissors
- Multi-tool or knife
- Shoe repair glue
- Spare zippers
- Sleeping pad repair kit
By taking these considerations and bringing along a list of repair items, you can be better prepared for any gear repairs that may arise during your trip. Remember, prevention is key, so always take care of your gear and inspect it regularly to catch any potential issues early on. Happy camping and hiking!